Monday, 11 February 2013

Mixed Vegetable Salad with Peanut Sauce


Yesterday was Chinese New Year and living right in the heart of Canada's oldest Chinatown we had front row seats to all the celebrations. Lion dancers, dragon dancers, fan dancers, fire crackers, red envelops of money and steamed buns. It was a great day of seeing our community in all it's ethnic beauty.
I'm going to share a not so Asian recipe with you today, but with perhaps a slight Asian feel. We have all had I'm sure, Satay sauce on noodles, but this is a lighter version on a mixed vegetable base. After steamed buns for lunch this light supper was perfect.

Mixed Vegetable Salad with Peanut Sauce
adapted from Australian Women's Weekly Vegie Food Cookbook

4 medium carrots, cut into batons
1 medium potato, coarsely chopped
200g cauliflower, cut into florets
100g snow peas, trimmed and halved
1 Lebanese cucumber, cut into batons
1 1/2 cups coarsely chopped iceburg lettuce
1 1/2 cups bean sprouts
1/2 cup coarsely chopped fresh coriander

Peanut Sauce
1/2 cup (70g) toasted unsalted peanuts
2 cloves garlic, quartered
4 green onions, chopped coarsely
1/2 tsp brown sugar
1 tbsp soy sauce
1/2 tsp chilli powder
1 tbsp lemon juice
3/4 cup (180ml) water
140ml can light coconut milk

Steam carrot, potato, cauliflower and peas, separately, until just tender; drain. Rinse under cold water; drain.
Meanwhile, make peanut sauce. Grind nuts, either in mortar and pestle or using a food processor, until finely crushed. Being careful not to over grind and end up with nut butter. Transfer nuts to a small bowl. Crush garlic and green onion into a paste, again using either mortar and pestle or a food processor. Cook garlic mixture in medium lightly oiled frying pan, stirring, 2 minutes. Add remaining ingredients; bring to a boil. Reduce heat; simmer, uncovered, 3 minutes. Add nuts; simmer, uncovered, 5 minutes.
Place carrots, cauliflower and peas in large bowl with cucumber, lettuce, sprouts and coriander; toss gently. Serve salad drizzled with peanut sauce.


You may well end up with extra sauce, so make sure you have some noodles for lunch later in the week, if you can resist the urge to eat the sauce straight from the bowl!
Gong Hei Fat Choi everybody.

Sunday, 27 January 2013

Pull Apart Coffee Cake

Um...where's my piece of cake?


 I received a complaint this week and it went something like this.

Dear Wife

Would it kill you to use sugar and butter in your baking recipes once in a while. I mean come on, it's a cookie for goodness sake, what part of sweet treat don't you understand?

Yours
Husband

Admittedly, he was some what more subtle in his message, but although the mouth was trying to wrap the complaint in a compliment, the eyes were saying the above. Truth be told, my baking mojo has been a bit off lately with cookies and cakes coming out tasting more like something produced by your local kindergartner during sand play. So although I will never make following a recipe whose only goal is to see me forever wearing elasticated pants while navigating the streets in my motorized arm chair, a permanent thing, I did go ahead and bake this cake to it's full sugar and butter potential. A reset of sorts. This cake is basically a giant doughnut, no, lot's of mini doughnuts stuck together. Heck who cares, it tastes like doughnuts, but without the deep fat frying. It is wonderful. As we sat around the table, ummmming with pleasure, Tim (fully embracing his opportunity to be smug) turned to me and said, 'You see, everything's better with sugar and butter'. Damn it, I hate it when he's right.


 Pull Apart Coffee Cake adapted from breadworld.com

1 envelope active dry yeast
1/4 cup warm water (100° to 110°F)
1 cup milk
1/4 cup butter OR margarine
2 cups whole wheat flour
1/4 cup sugar
1/2 teaspoon salt
1-1/2 to 2 cups all-purpose flour ( I needed less than a cup, so add slowly)

Sugar Blend:
1 cup sugar
1-1/2 teaspoons cinnamon
1/2 cup finely chopped walnuts (super finely chopped!)

1/2 cup butter OR margarine, melted
 
Directions
Dissolve yeast in warm water in a small bowl. Let rest 5 minutes. 
Heat milk and butter until warm (100° to 110°F). Combine yeast, milk mixture, whole wheat flour, sugar and salt in a large mixer bowl. Beat on medium speed with electric mixer for 2 minutes. Gradually add enough all-purpose flour until soft dough forms.
 Knead on a lightly floured surface until smooth and elastic (about 4 to 6 minutes). Place in a greased bowl, turning once to coat. Cover and let rise in a warm, draft-free place about 1-1/2 hours, until doubled.
Generously grease a fluted tube pan. Punch dough down and divide in half. Form 24 small balls of dough from each half.

 Mix together sugar, cinnamon and walnuts. Dip balls in melted butter and roll in sugar and nut mixture; place in pan. Combine leftover butter and sugar mixture and pour over dough.
Cover and let rise for 45 minutes or until doubled. Bake in preheated 375°F oven for 35 to 40 minutes. Immediately invert pan onto plate and allow to rest 1 minute before removing pan. Let cool 10 minutes before serving.

I know, a ridiculous amount of sugar and butter, but being a good wife means throwing the husband a bone every now and then, this time it just happened to taste like doughnuts. 


Due to technical difficulties (we ate it all!) I am unable to show you a picture of our cake. Here however is the cake in all it's sugary glory courtesy of breadworld.com 


Amazingly, two of those nuggets of joy are only 170 calories and 6g of fat. Not great, but as sugary treats go, not terrible either.
  

Thursday, 17 January 2013

A burning desire for cassoulet!


Okay confession time. I have this ......I think error is the best term to use. I have an inbuilt programming error that is so stupid and extreme it is amazing to me that I haven't been able to fix it. Here it is. I consistently burn my hand when baking casseroles. I do the same thing every time. I use oven gloves to remove the pot from the oven. Then remove the gloves and lift the 500F lid with my bare hands. EVERY SINGLE TIME! I have so many burn scars on my hands it's ridiculous. Last night it took a split second for my brain to register the burning sensation. I had that split second to wonder where the sizzling sound was coming from only to realize it was my hand becoming one with the pot. Most people keep ice in the fridge for their G&T, we keep it for casserole day!

Luckily, this casserole, or cassoulet as this particular dish is named, was so delicious I soon forgot the pain;)
Go ahead and use canned beans if you want, I happen to have dried in my pantry but use whatever is on hand at the time.

Vegetable Cassoulet adapted from The Australian Women's Weekly Vegie Food Cookbook
serves 4

1/2 cup (100g) dried borlotti beans
1/2 cup (100g) dried canellini beans
2 teaspoons olive oil
4 shallots (100g), halved
3 cloves garlic, sliced thinly
2 medium carrots (240g), chopped coarsely
200g mushrooms, halved
1 cup (250ml) dry white wine
2 medium zucchini (240g), chopped coarsely
1 1/2 cups (375ml) vegetable stock
1 can tomato paste
1 teaspoon finely chopped fresh thyme

BREAD TOPPING
1 tablespoon olive oil
1 small onion (80g), chopped finely
2 teaspoons finely grated lemon zest
1 clove garlic, crushed
2 teaspoons finely chopped fresh thyme
1/2 ciabatta (220g) diced into 2cm pieces
2 tablespoons coarsely chopped fresh flat-leaf parsley

Place beans in medium bowl, cover with water; stand overnight, drain. Rinse under cold water; drain. Place beans in medium saucepan of boiling water; return to a boil. Reduce heat; simmer, uncovered, about 15 minutes or until beans are just tender.
Preheat oven to moderate 350F (180C).
Heat oil in large flameproof casserole dish; cook shallot, garlic, carrot and mushroom, stirring, until vegetables are just tender. Add wine; bring to a boil. Boil, uncovered, until liquid is reduced by half. Add zucchini, stock, sauce, thyme and drained beans; return to a boil. Remove from heat; transfer to oven. Cook, covered, 50 minutes.
Meanwhile make bread topping.
Heat oil in large frying pan; cook onion, stirring, until soft. Add zest, garlic, thyme and bread; cook, stirring, about 10 minutes or until bread browns lightly. Stir in parsley.
Sprinkle cassoulet with bread topping; cook, uncovered, in oven about 10 minutes or until bread topping is browned.


Any country bread would work here, I used a white Italian loaf, but a light whole wheat whole grain would also be a great topping.
Don't forget your oven gloves!

Saturday, 12 January 2013

And we're back!


I know, slightly late and worse, no Merry Christmas and Happy New Year I'll be back on such and such a date before I disappeared from the web. Lack of planning on my part and then copious amounts of chocolate eating during the holidays addled the brain a bit, or something like that anyway.
But here we are again and I have been spending a lot of time with my head buried  in cookbooks so let's get started. So we're all on a diet, okay well some of us are on a diet, well truthfully the diet started and ended on January 1st, but we are making more health conscious choices, right? Good, then you are going to love this salad. It's fun to make, pretty to look at has only a few ingredients and tastes great, plus it's super good for you too.


Patricia Wells' Green Lentil Salad on Zucchini Noodles adapted from Food52
 serves 4

1 large zucchini
1 lb french lentils
1 medium onion, halved and stuck with two cloves
1 garlic clove, peeled
1 bay leaf
1/4 cup red wine vinegar
2 tablespoons
olive oil
salt and pepper to taste

Rinse lentils and put in a pot with the onion, bay leaf and garlic. Cover with cold water by one inch. Cover the pot and bring to a boil over medium heat. Reduce heat to low and simmer for 20 -25 minutes until lentil are done. All the water should have been absorbed, if not drain then discard onion, bay leaf and garlic. Whisk olive oil and vinegar and season with salt and pepper. Pour two thirds of the dressing over the lentils and leave to rest for 15 minutes.
Meanwhile, wash, top and tail the zucchini. Using a vegetable peeler, slice the zucchini into long strands similar to linguini or fettuccine. Pile the zucchini 'noodles' in a serving dish and toss in the remaining dressing. Place the lentils on top of the zucchini 'noodles' and serve immediately.


This makes a lot of lentil salad and although we could have eaten it all, I held back some of the lentils and had it for lunch the next day with some butternut squash I pan cooked in some butter and olive oil. Yum!


Friday, 21 December 2012

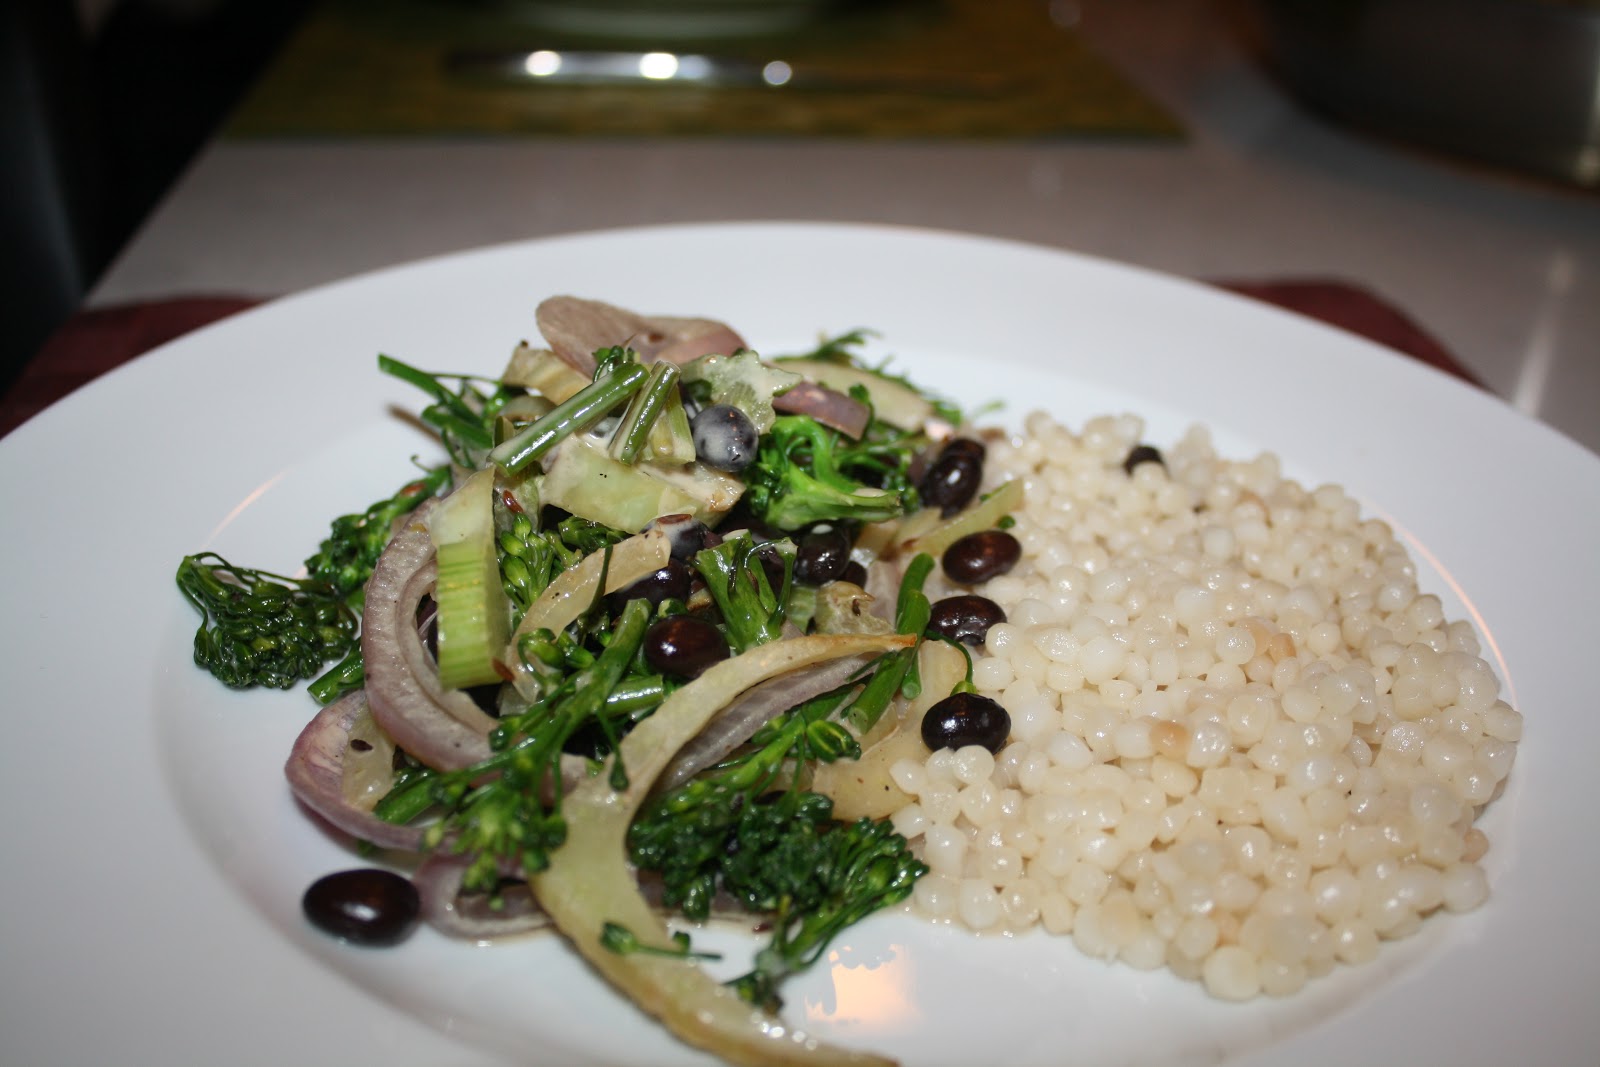
Broccolette, Black Bean and Coconut with Israeli Couscous


We have furniture, just. After a long wait our sofa finally arrived today so our beds are no longer the sole place for us to park it. Had some heart palpitations when the movers arrived at the building and insisted there was no way it was going to fit in the elevator. They measured and calculated, then measured and calculated some more in the stairwell. Nope, there was no way it was going up to our apartment. I was close to tears at this point as the return policy was not favourable and let's just say this particular sofa is what you might call an investment piece. Anyway they brought it in and what do you know, it fit just fine! So now I have a sleek sexy Italian beauty to snuggle with every evening! Well, daytime too if today is anything to go by, just couldn't pull myself away. Hence today's recipe. This is a combination of what I had in the pantry and fridge (sound familiar) because someone didn't go to the grocery store ( blame the Italian). I must say, it turned out not bad at all.

Recipe

Broccolette, Black Bean and Coconut with Israeli Couscous
serves 4

1 bunch broccolette
1 small or 1/2 medium/large fennel, sliced
1/2 red onion, sliced
1 clove garlic, crushed
1/2 can black beans
1 tbsp olive oil
1/2 can coconut milk, well shaken
1 tsp caraway seeds
salt and pepper

Israeli Couscous
1 cup Israeli couscous
2 cups water

Make the couscous. Bring the water to a boil and add couscous. Simmer gently until soft, approximately 10 minutes. Israeli couscous is actually a pasta, so cook it as you would pasta. Drain and set aside.

Meanwhile heat the olive oil in a large pan and over a low heat gently cook the fennel, onion and garlic, until soft, 5-7 minutes. Trim the broccolette, removing any tough outer layer from the stems. Chop the stems and add to the fennel mixture, keeping the flower heads back. Cook for a further 5 minutes. 
Drain and rinse the black beans and add to the fennel mixture with the broccolette flowers and gently heat through, 3 minutes. Pour over the coconut milk and heat for another 5 minutes until hot.
Season with salt and pepper to taste and sprinkle in the caraway seeds.
Serve over the Israeli couscous.


 The rather pathetic alternative tree is up by the way.  Rather ingeniously and because we are cheap, we fashioned a base for our branch from a laundry hamper. Had a panic moment when we couldn't find Christmas lights for sale anywhere, but we eventually found one beaten up box of rather blueish looking lights after a desperate search around town.  It is quite possibly the weirdest Christmas tree ever!


Tuesday, 18 December 2012

Alternative Christmas Tree and Lazy Moussaka


 It's only been a week for us as downtown residents but it may be that's all it takes for me to establish myself as the local nut. Let me explain. There are some rules to condo living it seems, one such rule dictates the installment and removal of Christmas trees. Not one needle can be dropped on communal territory and no trees may be discarded either in the garbage room or left outside the property for pick up. So what are we to do? Well, we could of course wrap the tree well so as to catch all wayward needles and investigate where we might take our tree once the twelfth night is upon us. However, that seems like too much work for us folks. Last year, we took a vacation right after Christmas and decided to go the alternative tree route. Having a house back then, it was easy to haul in a large piece of ply, slap on a coat of blackboard paint and chalk on a simple tree outline, staple gun on the lights and voila. With no one home to vacuum the needles and haul the tree out on pick up day, our alternative tree was perfect. This year I had it in my mind that a branch in a pot would be our alternative. Today, I headed out to the local park to scavenge around for a fallen twig or two. (Here comes the local nut status part.) I didn't find a twig or a stick, I found half a tree! Okay, maybe not half a tree, at least that's not how it started out, but let me tell you, once I left the park and hit the streets and the closer it got to rush hour, the bigger I swear that branch got. What was a 10 minute walk to the park felt like a 10 hour walk home.When a young boy asked his dad what the heck that lady was doing with that stick, I knew things were not looking good for my rep here in town. As I wrestled twisted trunk and long unruly branches between pedestrians, around corners, across streets and ultimately through the apartment front door, wrapping a real tree and driving to a recycling depot didn't seem like too much work after all. I have yet to get the branch up to our apartment, it's hiding out in the back of our enormous truck (seems we don't do things small around here!) Tomorrow I shall enlist the help of Tim and Elliot, more as lookout patrol members, don't need the neighbours thinking I'm nut's too.

As you can imagine, all of today's shenanigans left me quite spent of ..um...pride?...no energy, that's it, so what is a girl to do but take a short cut in the kitchen. Lazy Moussaka was born. It is basically sort of Moussaka ingredients, kind of put together in, well, the laziest way possible. Enjoy.


Recipe

Lazy Moussaka

enough bolognese sauce for 4, use your favourite recipe
1 aubergine, sliced into 1/4 inch rounds
olive oil
2 tsp ground black pepper
2 tsp ground cumin
1 package goat cheese

Turn on your broiler. Place the aubergine slices on a baking sheet and drizzle on some olive oil. Evenly sprinkle on the black pepper and cumin. Place under the broiler and cook until starting to brown slightly. Turn the broiler off and leave the aubergine in the hot oven to continue cooking slightly.
Prepare your bolognese sauce or reheat if you happen to have some lying around(?).
To serve, place one aubergine slice on your plate, top with some sauce and sprinkle on some of the goat cheese. Repeat with two or three more slices of aubergine, layering with the sauce and goat cheese.
Top with some fresh oregano and cracked black pepper.

How lazy was that, I didn't even give you a sauce recipe! Tell you what here's a link to a good one, that's the best I can do tonight, tree wrangling is exhausting work.

Sunday, 16 December 2012

Baked Chicken with Roasted Red Peppers and Spinach


I can't believe we've been in our condo for a week already. We are slowly exploring our new neighbourhood and discovering exciting shops and interesting people everyday. We've had drinks, twice, with the lovely Eve from the floor below who I believe will have us pickled in no time. Thank goodness she only lives here on the weekends! Truth is, I'm a lightweight and it doesn't take much more than one gin and tonic to get me giggling at nothing. I managed to drag myself back up the stairs to our floor where my two hungry boys were waiting for dinner. I needed something fast and simple that didn't require any knife skills!

Having a jar of roasted red peppers to use up, I hit up Google for a tasty recipe and the above colourful delight graced our table in no time. It was quick, simple and delicious. The recipe called for basil leaves but having only spinach in the fridge I used them instead.

Recipe

Baked Chicken with Roasted Red Peppers and Spinach
adapted from inspired taste

serves 4

4 chicken breast, cut into smaller pieces
1 jar roasted red peppers, cut into smaller pieces if whole, reserve liquid
2 large handfuls fresh baby spinach leaves, washed and stems removes
1/2 cup orange juice
freshly cracked black pepper

Preheat oven to 400F (200C).
Arrange chicken pieces, roasted red peppers and spinach in your baking dish, starting with spinach, then chicken then peppers repeating until the dish is full.
Pour over the reserved liquid from the jar of red peppers and the 1/2 cup orange juice. Top with black pepper.
Bake in a preheated oven for 30 minutes or until chicken is cooked through.
Serve with mashed potatoes to soak up all the cooking liquid.

This is such a simple, quick and easy supper dish. The basil would give it a whole other flavour and I look forward to trying it that way, however the red peppers are strong enough to flavour the dish on their own and it didn't lack for the substitution.

Thursday, 13 December 2012

Peach Cake with Crumble Topping


Hello my name is Claudia and it's been oh all of five minutes since my last piece of cake/cookie/tart/pie/....well you know, anything baked really. It seems I may have a bit of a problem as here I am posting about cake again! This is yet another throw it all together at the last minute with what I had in the fridge, kind of recipe. Hooray for canned fruit. You know you have a problem when dessert takes precedence over dinner. Soggy pasta anyone?

Recipe

Peach Cake with Crumble Topping
serves 12

1/2 cup butter, at room temperature
1/2 cup sugar
1 cup sour cream
2 eggs, lightly beaten
1 tsp vanilla extract
2 cups all purpose flour
1 1/2 tsp baking powder
1/2 tsp baking soda
1 can peach slices 

Topping
1 1/2 cups flour
1/2 cup butter
1/4 cup sugar

Preheat oven to 325F (170C). Grease a 9x9 inch baking pan.
Cream butter and sugar. Beat in sour cream, eggs and vanilla. Add flour, baking powder and baking soda. Mix until just combined.
Spread half the mixture into prepared pan. Top with drained peach slices. Spread remaining cake mixture on top of fruit.

For the topping, melt the butter then add the flour and sugar. Mix it all together until a crumbly texture is formed. Sprinkle this mixture on top of the cake.

Bake in the preheated oven for 45 minutes or until a toothpick inserted in the cake comes out clean.
Serve warm with vanilla ice-cream or vanilla bean infused whipped cream.

 The truth is I only had about 2 tbsp of sour cream left so added natural yoghurt to make up the rest. I also ran out of butter so mine was made with less. They say baking is a science not an art, but you know I often reduce the amount of sugar and fat when I bake (it's necessary considering how much baking we eat!) and have yet to have a problem. Don't be afraid to experiment. This was more cakey than peachy, so if you want it more peachy than cakey, add another 1/2 to 1 can of peaches as I will next time.

Wednesday, 12 December 2012

Quinoa and Apple Salad with Curry Dressing


Okay so the truth is I haven't really been cooking much these last few days, despite having a wonderful new kitchen. We seem to be out and about everyday, changing our driver's license from Ontario to BC, as well as health care, moving the trailer from A to B, unpacking and re-arranging oh and home schooling. I will start getting creative soon but until then how about I share another recipe from Martha Stewart . This is one of my favourite salads, quick, simple and oh so delicious. I had to stop myself from posting yet another cake/dessert recipe, it seems I may have a problem as that's all I want to cook and eat these days!

Recipe

Quinoa and Apple Salad with Curry Dressing from Martha Stewart Living
serves 4

1/4 cup raw whole almonds
1 cup white quinoa
1 tsp honey
1 tbsp finely chopped shallot
1 tsp curry powder
1/4 tsp salt
2 tbsp fresh lemon juice
freshly ground black pepper
2 tbsp extra-virgin olive oil
2 tbsp dried currants
1 small McIntosh apple, cut into 1/8-inch-thick wedges
1/4 cup loosely packed fresh mint leaves, coarsely chopped, plus more for garnish

Preheat oven to 375F (190C). Spread almonds on a rimmed baking sheet; toast in oven until lightly toasted and fragrant, about 7 minutes. Let cool; coarsely chop nuts.

Rinse quinoa thoroughly in a fine sieve; drain. Bring 2 cups  water to a boil in a medium saucepan. Add quinoa; return to a boil. Stir quinoa; cover, and reduce heat. Simmer until quinoa is tender but still chewy, about 15 minutes. Fluff quinoa with a fork; let cool.

Whisk together honey, shallot, curry powder, salt, and lemon juice in a large bowl. Season with pepper. Whisking constantly, pour in oil in a slow, steady stream; whisk until dressing is emulsified. Add quinoa, currants, apple, mint, and nuts; toss well. Garnish with mint.


This is one of those great salads that transports well and tastes even better the next day, although the nuts are more soft than crunchy so you may want to throw in a few more for second day eats.

Tuesday, 11 December 2012

The Quick French Tart


 You're picturing a woman running down the road aren't you? Well stop it, this is a food blog.
My french tart is all butter and sugar as only a french tart can be. It's also amazingly simple and incredibly quick to make for those emergency moments when you need a french tart, stat. My friend, Jacques Pepin taught me how and it was one of those 'oh my gosh, that is so clever' moments when he revealed the no effort base, tortilla! Melt a tablespoon of butter on your baking tray, which you have lined with parchment paper, sprinkle on a teaspoon of sugar and rub a flour tortilla in the mixture on both sides. Then top with the fruit of your choice, sprinkle another teaspoon of sugar on top followed by another tablespoon of butter, dotted around the fruit and cook at 400F (200C) for 25-30 minutes. Voila, a quick french tart.

I made an apple tart last night, but you can use any fruit, even canned fruit. Cook the syrup down in a pan and use it as a glaze at the end. For a glaze when using fresh fruit, just warm up a bit of apricot jam and brush that over the top.

Monday, 10 December 2012

About Friday, and high energy treats.


Image from My New Roots


So about my absence on Friday, I do have a good reason, although it's slightly embarrassing really as it makes me a bit of a fraud. You see I'm not writing this from my tin can kitchen, I'm actually writing this from my brand spanking new loft. The tin can is not dead however, we're just having a dose of normalcy while we sort out a few things and plan our next step. So if you all agree, I'll keep posting from my not so small kitchen and we'll just pretend everything is the same until we hit the road again. All agreed? Excellent.

Well moving house is hard work, even when you own very little. How we fit five truck loads of belongings in the trailer I'll never know but the weekend was spent schlepping them up from the parkade to the forth floor. All that exertion required reward and energy replacement. Today's recipe is from My New Roots, quite possibly my favourite foody blog. The Raw Brownie is nothing to fear, it is every bit as decadent and gooey and delicious as the real thing but a million miles better for you. Don't be fooled into thinking it's low calorie however as it most definitely is not, but the energy comes to you from whole foods of nutrient rich goodness rather than empty calories that just sit on your hips and remind you why you shouldn't have eaten the whole tin. Whereas the brownie you know is all butter and sugar and flour, the raw brownie is just three things, dates, cacao and walnuts. I'm posting the recipe here, but head over to My New Roots and Sarah will tell you how amazing her Raw Brownies are for you herself.

Recipe

The Raw Brownie from My New Roots

2 cups whole walnuts
2 ½ cups Medjool dates, pitted
1 cup raw cacao
1 cup raw unsalted almonds, roughly chopped
¼ tsp. sea salt

Directions:
1. Place walnuts in food processor and blend on high until the nuts are finely ground.
2. Add the cacao and salt. Pulse to combine.
3. Add the dates one at a time through the feed tube of the food processor while it is running. What you should end up with is a mix that appears rather like cake crumbs, but that when pressed, will easily stick together (if the mixture does not hold together well, add more dates).
4. In a large bowl (or the pan you plan on putting the brownies in), combine the walnut-cacao mix with the chopped almonds. Press into a lined cake pan or mold. Place in freezer or fridge until ready to serve (it is also easier to cut these when they are very cold). Store in an airtight container.


I know right, super good for you and ready in minutes, you could even scoop it right out from the bowl of your food process, which I've never done, honest! Actually, talking of scoops, this is a great recipe for a Christmas gift exchange. Instead of making a flat brownie, you could roll this mixture into little balls and have on your hands the most delicious truffles. Roll then in crushed nuts or coconut, ooh or melted dark chocolate, yum, and you my friends will be the stars of your social circles! I keep mine in the freezer all the time as they don't ever really freeze solid, we just eat them straight from there, sometimes even on a plate while sitting down at the table:)


Thursday, 6 December 2012

Braised balsamic leeks with creamy polenta


I have a confession, I am scared of polenta, or rather, I was scared of polenta. All that having to mix hard and fast to prevent lumps had me backed into a corner biting my nails. Plus it boils angrily, big hot volcanic mud pools of bubbling mass ready to send you to the hospital with major burns and a ruined manicure. Oh wait I already ruined the manicure with all that nail biting, see what polenta did to me! Well there must have been some courage added to my morning coffee as I decided to bite the bullet and cook today's recipe and you know what, it turns out polenta was all bubble and no bite. I had that corn meal whipped and tamed into a smooth puddle of creamy loveliness in no time at all. Was it worth it? I think so yes. Polenta only has as much flavour as you add to it so it's versatility is worth the crazy beating, plus I was able to use the leftovers to create a bonus meal with the polenta having taken on a whole other personality.

Recipe

Braised balsamic leeks with creamy polenta adapted from Australian Woman's Weekly Vegi Food cookbook.

serves 4

2 large leeks, trimmed
2 teaspoons olive oil
1 clove garlic crushed
1 red onion, sliced
1 large red capsicum, sliced thinly
2 tablespoons balsamic vinegar
1/3 cup firmly packed fresh flat leaf parsely

Creamy Polenta
2 cups (500ml) water
1 cup (250ml) vegetable stock
1 1/4 cups (310ml) skim milk
1 cup polenta
2 tablespoons finely grated parmesan

Half leeks crossways; cut halves into quarters lengthways.
Heat oil in a large saucepan; cook garlic, stirring until fragrant. Add leek, onion and capsicum; cook, covered, stirring occasionally, about 20 minutes or until leeks softens. Add vinegar, cook, uncovered, stirring occasionally, until almost all liquid has evaporated.
Meanwhile make the polenta. Combine the water, stock and 1 cup of the milk in a medium saucepan; bring to a boil. Gradually add polenta to liquid, whisking like a crazy person. Reduce heat; simmer, stirring, about 10 minutes or until polenta thickens. Stir in cheese and remaining milk just before serving.
Stir parsely into leek mixture. Serve with creamy polenta.

I've given you the recipe as published, except for the addition of the red onion. I found it lacking a bit in oomph though. You know oomph right, that secret ingredient all chefs carry with them wherever they go. Oh no wait, that's salt. Anyway, I solved the oomph problem by adding an extra tablespoon of balsamic to the leeks and some extra cheese and cracked black pepper to the polenta. Feel free to experiment with your own addition of oomph as you see fit:)
Oh and for those who don't know what polenta is, it's yellow cornmeal and you should be able to find it in your grocery store where the dried beans and pulses are, or in the bulk section.

Wednesday, 5 December 2012

Spicy sausage, kale and beans


Last nights dinner was one of those staples that you always have in your back pocket. So sorry, nothing exciting to report today, unless of course you want to hear about the time I accidentally caused a bit of an international incident once while flying to.......no? Oh okay then, here's the recipe

Recipe

Spicy sausage, kale and beans
serves 4

4 hot Italian sausages, casing's removed and broken into bite sized pieces
1 tbsp olive oil
1 onion, coarsely chopped
2 cloves garlic, chopped
1 large bunch of kale
1 can cannellini beans with liquid
1/2 cup vegetable stock
pinch of red pepper flakes to taste
salt and pepper

Heat olive oil in a large frying pan. Add sausage pieces and cook until brown all over. Add onion and garlic and cook stirring for 1 minute; do not let garlic brown. Add stock and cover; cook for 5 minutes or until sausage is cooked through.
Wash kale, removed tough stems and tear the leaves into bite sized pieces.Place kale directly on sausage mixture. Pour over beans, including the liquid from the can. Cover and cook for another 5 minutes or until kale is wilted. Season with salt and pepper to taste.
Sprinkle on red pepper flakes and stir everything together.
Serve immediately with a favourite crusty bread.

Using the liquid from the tin of beans, gives the dish a thicker sauce and adds a starchiness to the taste. Sometimes I like that and sometimes I don't, so you can rinse and drain the beans if you prefer and add a little more stock or water when adding the kale. Even though we're using hot Italian sausages, we like things spicy so the extra pepper flakes are a must for us. The dish works well without to. Finally, if you want you can grate over some parmasan or a good Gruyere would work too.


Tuesday, 4 December 2012

How to lose weight


Steps to losing weight.

  1. Discover veteran french chef and former cooking partner of Julia Child, Jacques Pepin
  2. Obsessively watch every cooking show he ever made on YouTube
  3. Go to kitchen and prepare dinner while addressing a fake television audience
  4. Speak in a french accent
  5. With your hours of YouTube coverage, feel a certain bravado and do that one handed flipping thing with your frying pan
  6. Clean half of your planned dinner off the floor
  7. Face the hard glare's of your family as you sheepishly apologize for the tiny portion sizes
Voila, smaller portions, less calories, guaranteed weight loss.

Or cook the above pasta dish inspired by Monsieur Pepin's love of butter and salt and say to hell with weight loss. I made this dish up as we had no food in the house except a bit of pasta, one zucchini in the bottom of the fridge, an onion, some garlic and the last bit before the rind of some parmasan cheese. Oh yes and two hungry boy's wanting to know what was for lunch as it was now 3pm. Time flies when with M. Pepin!

I didn't really make a note of what I was doing as this wasn't something I thought I was going to share, but it was so good and quick, I just had to tell you about it.

Basically I put about 1-2 tbsp of olive oil in my pan and gently sauted the onion, garlic and zucchini. When it looked like it might brown I added about 1/4 cup of vegetable stock and covered the pan. After a few minutes when the vegetables were soft I added cracked black pepper. Removing the lid I let the liquid cook down until almost all gone, to develop the flavours.
Meanwhile I had put the pasta on to cook. When it was done I added about 1/2 cup of the well salted pasta water to the vegetables then poured in the well drained pasta.
Next came a good tbsp of butter and about 1/4 cup of grated parmasan.
Serve immediately with extra parmasan and cracked black pepper.

Simple, non? Let's face it, slip a knob of butter into anything and it's going to be good; (now all I can think about are all the things that a knob of butter wouldn't work with, like a cup of coffee, but you know what I mean).

As Jacques Pepin would say....'appy cooking!

Monday, 3 December 2012

Christmas Stollen

Image taken from MarthaStweart.com


 Monday's I usually post something breakfast related, but if you are German and it's Christmas you will probably have Stollen on your breakfast table. I'm posting it today because yesterday was the first Sunday of Advent and we have a little tradition where we always have Stollen that first day with our afternoon tea as we light the first candle on our wreath.
Typically I make Stollen, but I thought it might be pushing my luck to ask the tin can's oven to perform such a feat, seeing as it's incapable of browning anything. The first time I made it was under the careful tutoring of Martha Stewart and her mother and it's the recipe I have used ever since. So here it is for you;


Mrs Kostyra's Stollen Wreath Bread taken directly from MathaStewart.com


  • 1 cup currants
  • 1/4 cup cognac
  • 1 1/4 cups golden raisins
  • 1/4 cup orange juice
  • 5 1/2 cups all-purpose flour, plus more for dusting
  • 6 tablespoons sugar
  • 1/2 teaspoon salt
  • 1/4 teaspoon ground mace
  • 1/4 teaspoon freshly grated nutmeg
  • 1 cup milk
  • 10 tablespoons unsalted butter, plus 3 tablespoons, melted
  • 1/4 cup warm water (about 110 degrees)
  • 2 packages active dry yeast (5 teaspoons)
  • 3 large eggs, lightly beaten
  • Grated zest of 2 oranges
  • Grated zest of 1 lemon
  • 3/4 cup chopped citron
  • 1/4 cup chopped dried apricots
  • 1 1/4 cups blanched almonds, coarsely chopped
  • Confectioners' sugar, for dusting
 Directions
  1. In two separate bowls, soak currants in cognac and golden raisins in orange juice; set aside. In a large bowl, sift together flour, sugar, salt, mace, and nutmeg; set aside. In a small saucepan, combine 1 cup milk and 10 tablespoons butter over medium-low heat until butter is melted. Let stand until lukewarm, about 5 minutes.
  2. Pour 1/4 cup warm water into a small bowl; sprinkle with yeast, and let stand 2 to 3 minutes. Stir to dissolve yeast completely. Add the dissolved yeast, warm milk mixture, and eggs to the flour mixture. Turn the dough out onto a floured work surface, and knead until fairly smooth. Transfer dough to a large bowl.
  3. Add currants and raisins in their liquid, orange zest, lemon zest, citron, apricots, and almonds, and then work them into the dough with your hands. Transfer dough to work surface, and knead for about 10 minutes. If the dough is sticky, knead in more flour, but be careful not to overwork.
  4. Butter a large bowl with 1 tablespoon melted butter. Place the dough in the bowl, turning to coat. Cover with a kitchen towel, and let rise in a warm place until doubled in bulk, 1 1/2 to 2 1/2 hours.
  5. Preheat oven to 375 degrees. Punch dough down, roll into a rectangle about 16 by 24 inches and 1/4 inch thick. Starting with a long side, roll up tightly, forming a long, thin cylinder. Carefully transfer dough to a Silpat- or parchment-lined baking sheet; join ends together, pinching with fingers if necessary to make it stick, forming a large circle.
  6. Using sharp kitchen scissors, make cuts along outside of circle, in 2-inch intervals, cutting 2/3 of the way through the dough. Twist each segment outward, forming a wreath shape with all the segments overlapping.
  7. Cover dough with a clean kitchen towel; set aside to rise for 30 minutes. Dough will rise only a little bit. Brush dough with remaining 2 tablespoons melted butter. Bake until golden brown and crusty, about 45 minutes, rotating halfway through. Place baking sheet on a wire rack to cool. Dust with confectioners' sugar before serving.
This makes one very large wreath, I usually divide the dough in two and sometimes make two smaller wreaths or sometimes two loaves. One gets eaten over the lead up to Christmas and one gets well wrapped and frozen for another time (okay we eat both within a few weeks of each other, but that's just how good it is!)

Suffering our way through a shop bought stollen.
What's that? A second third slice, oh go on then!


Friday, 30 November 2012

Quick Baked Beans and Grilled Cheese with tomato chilli relish


Managed not to set off any alarms today, although did run out of gas half way through cooking! A quick switch-a-roo of the tanks and we were back on track. Sometimes I get into a lunch rut where we alternate between salad and left overs so I thought I had better earn my keep and feed my hungry boys something different. I had two cans of white kidney beans in the pantry and despite Elliot's chilly relationship with pulses, home baked beans seem to get a thumbs up. I'm making my way through the Australian Woman's Weekly cookbook at the moment and this is a mix of two recipes. The beans they served with parmasan polenta and the relish is from a lentil and bean burger dish. I had made the relish a week ago when I whipped up some chickpea burgers and thought it would go well with the grilled cheese. I was right!

Recipe

Quick Baked Beans and Grilled Cheese with tomato chilli relish
adapted from Australian Woman's Weekly
serves 4

For the beans
1 tbsp olive oil
1 large brown onion, finely chopped
1 clove garlic, crushed
2 cans white kidney beans, drained and rinsed
1 can crushed tomatoes
2 tsp dark brown sugar (optional)
1 cup vegetable stock

For the relish
2 medium tomatoes, chopped coarsley
1 small onion, chopped finely
1 clove garlic crushed
1/3 cup sweet chilli sauce
2 tablespoons malt vinegar

8 slices bread of your choosing
sharp cheddar or similar cheese (enough to cover 4 slices of bread)
2 tbsp butter

Preheat oven to 400F (200C).
In an ovenproof pot, heat the oil and gently cook the onion and garlic, stirring until onion softens. Add beans, tomatoes,sugar and stock; bring to a boil. Cook, uncovered, in oven about 40 minutes or until sauce thickens.

Make the relish by cooking the tomatoes, onion and garlic in a small saucepan for about 10 minutes over medium heat or until tomato has softened. Add sauce and vinegar; bring to a boil. Reduce heat; simmer uncovered, stirring occasionally, about 10 minutes or until relish thickens. Cool 15 minutes.

Once beans and relish are cooked, heat 1/2 tbsp of butter in a pan. Spread one slice of bread with relish and place, relish side up in pan, top with cheese and place second slice of bread on top. Cook gently, 7-8 minutes or until underside is golden brown and cheese is starting to melt. Flip the sandwich over and cook the other side until it too is golden. Repeat with the remaining slices of bread.

Serve grilled cheese with beans on the side.

Have a great weekend and don't forget to check your advent calendars Saturday morning, a month of chocolate, oh how I love December!

Thursday, 29 November 2012

Adam Sandler, Martha Stewart and plans beyond the tin can's capabilities

 image from Martha Stewart


That picture up there, with the perfect pie, that was going to be a picture of my perfect pie's, not Martha's. I promised the good, bad and ugly so here goes. It's a bit long winded and there's a tangent in there too, so bear with me!

Okay so earlier this week I made cookies, no big deal I make them a lot. I have my go to recipe, a chocolate chip oatmeal that over the years I have stripped of fat and sugar and made sufficiently healthy. This week though I felt we had had a bit of an oat overload in our diet and searched the web for an alternative. Many recipes came up with roughly the same ratio's of fat to sugar and I thought just this once (okay twice if we count the flapjacks) we would have the real thing in all it's high fat, high sugar glory. So I got as far as creaming the half cup of butter and the one cup of brown sugar and one cup of white sugar when I realized I couldn't do it. Now, I have this crazy thing where I think that if I just sub in one healthy thing, it will somehow void all the unhealthy stuff. So I put away the white flour and turned to my trusty whole wheat and for good measure threw in a few tablespoons of ground flax too. (See what I mean, like ground flax and undo all that butter and sugar, but it makes me feel better so there.) This however turned the mixture from light drop cookies to firm cookie dough, again, no big deal. I rolled it up into two long sausages and popped them in the freezer planning to bake some later and have the rest ready when needed.

So the pie's up there in the picture, well I've had a craving for meringue lately and the above pictured recipe came to mind. It was published a long time ago and I had only made it once before but it was delicious. Thinking myself so smart and such a culinary genius I had an ah ha moment. Why not make the bases from the cookie dough instead of pastry. Want to see how that turned out?


Yeh, well, turns out I'm not a culinary genius. It was actually a good thing as the truth is the meringue would have been a disaster too as I don't have a broiler. Honestly, I don't know what I was thinking.

Where does Adam Sandler come into all this? Well to cap my day of kitchen hopelessness off, I made 'The Worlds Greatest Sandwich', introduced to us by Adam Sandlers character in the movie Spanglish. Turns out you can't cook bacon in an rv without smoking out the whole family and setting off the alarm. The world's greatest sandwich rapidly turned into the totally not worth it sandwich (not really) as I ran between the alarm armed with a tea towell  which I flapped desperately at the ceiling, the stove top where the bacon was causing all kinds of trouble, while trying to pry two bread rolls apart that had morphed into one between baking and freezing.

So what does one do when your kitchen turns against you. You call in the Doctor.


At least pudding was good:)


Recipe

The World's Greatest Sandwich  from the movie Spanglish


Wednesday, 28 November 2012

Goat Cheese and Chickpea Couscous


Being two meat eaters and a vegetarian, we alternate our days so I'm not making two meals every night. Last night was veggie night and I had a real craving for chickpeas, food enemy number one for my son, he hates those round nuggets! Making matters worse was my addition of walnuts and goat cheese, another two items on his hit list! All in all a terrible food night for the poor boy, only made better by the promise of Pork En Croute tomorrow, one of his favourite meals. Actually, he ate the whole thing up and begrudgingly admitting that it wasn't terrible, high praise indeed!

I love chickpeas, not only is this wonderful pulse versatile but it's nutritional content packs an all round health promoting punch. Chickpeas are high fiber and low glycemic, so great if you're on a diet as they will keep you satisfied for longer. They are also a fat free source of protein as well as being high in calcium (almost like for like with milk). But wait that's not all, chickpeas are also known to help lower bad cholesterol and reduce the risk of heart disease. Other nutrients include iron, manganese, potassium and molydenum a needed mineral for those sensitive to sulfites. Yummy and nutritious, yay chickpeas!

Recipe

Goat Cheese and Chickpea Couscous
serves 4

2/3 cup couscous
1 cup water
1/4 tsp salt
1 tbsp olive oil or butter
zest of 1 lemon
2 tbsp of freshly chopped parsley
1 can chickpeas, drained and rinsed
1 pkg soft goat cheese
1/2 cup chopped walnuts
1/4 cup pitted and chopped kalamata olives (or favourite olive of your choice)
salt and pepper
1 tbsp chopped mint

In a small saucepan bring water, salt and oil or butter to a boil. Pour in the couscous, remove from heat. Cover the pan with a lid and allow to sit for 5 minutes. Fluff with a fork. Stir in the lemon zest and parsley.

Meanwhile place a small pan over low heat and add chickpeas, walnuts and olives and stir just until warmed through. Season to taste and off the heat stir in the mint and crumbled goat cheese.

Divide the couscous between plates and top with the chickpea mixture. Eat immediately.

This is a light supper or for a lunch on the go either pack in a transportable container or use as a filling for a wholewheat wrap.

Tuesday, 27 November 2012

Simple soup


 It's beautiful here at the moment, we've had a nice run of sunny days, but boy is it cold in the evening. You'll find me permanently positioned next to our little table top electric heater once the sun starts sinking (shhh, don't tell the boys I'm hogging all the heat!). The only thing to do when cold seeps in down to your bones of course is make soup and this recipe is from Australian Women"s Weekly Vegetarian Cook Book. It's nothing fancy, just a basic minestrone, but it hit the spot last night.

Recipe

Minestrone from The Australian Women's Weekly Vegie Food Cookbook
serves 6

2 tsp olive oil
1 medium onion, chopped finely
2 cloves garlic, crushed
1 trimmed celery stalk, chopped coarsely
1 large carrot, chopped coarsely
4 cups (1 litre) vegetable stock
1 cup (250ml) water
1 28fl oz can crushed tomatoes
1 medium zucchini, chopped coarsely
2 cups finely shredded cabbage
150g small shell pasta
14 fl oz can white beans, rinsed, drained
1/4 cup coarsely chopped fresh flat leaf parsely
3/4 cup shaved parmesan

Heat oil in a large saucepan; cook onion and garlic, stirring, until onion softens. Add celery and carrot; cook stirring, 5 minutes.
Stir in stock, the water and undrained tomatoes; bring to a boil. Reduce heat; simmer, covered, about 20 minutes or until veggies are tender.
Add zucchini, cabbage, pasta and beans; cook uncovered, about 15 minutes, or until pasta is tender. Stir in parsely.
Serve soup topped with cheese.

Try and get a really good quality strong parmesan, it takes the soup from' meh, I'm a pretty basic veg and pasta soup' to a veg and pasta soup that's smoky, gritty, nutty and fruity. Of course I could be talking about myself there! Did you know that they test parmesan by having a master grader go round and tap the cheese wheels with a hammer while listening to the sounds created. The master grader or Consorzio, can tell from this if the cheese has undesirable cracks or voids inside. He would then mark the rinds with crosses or lines to signify a lesser quality cheese. Nowadays, they leave  any markings off the rind if it's of a lower quality. So when buying parmesan make such you can see the name of the maker on the rind.

Hope you're staying warm in your part of the world.

Monday, 26 November 2012

Be a softy!


Let's face it dipping your soldiers into a hard boiled egg is no fun. Who doesn't love pretending a volcano is erupting on your plate after all. But the most important reason for being a softy is lecithin. Lecithin is a wonderful nutrient found in all living cells. It is a phospholipid, so a fat essentially, but a darn good one!. You remember when eggs were public enemy number one because of the whole cholerteral thing? Well the funny thing about that is that lecithin, although a fat, actually helps prevent fats in the body from accumulating and reduces cholesteral. So it helps break down fats, but what else can it do? you ask. Well it helps brain cells develop and aids in memory retention. Did you know that your brain is comprised of about 1/3 lecithin. Seriously this stuff is in every part of you. Lecithin is also known to help with hyperactivity and depression as it forms part of a protective coating, essentially, that surrounds and insulates nerve fibers, this is also of benefit for those with insomnia. Our bodies do produce lecithin but not enough for the hard lives we live. As with most things if you have a good whole foods diet, you are probably getting enough. The humble egg being one of your sources. However if you scramble, fry or bake those yolks hard, you are losing out. Lecithin, although an incredible nutrient, can't handle the heat and you destroy all that goodness when you cook those yolks. Soft boiling or poaching are your best options.

 So line up your soldiers and be a softy.